System for waterproofing and installing ceramic tiles or mosaic in damp environments on a waterproofing and anti-fracture membrane

New building
Internal flooring; Wet environments
Installation of ceramic tiles

Application steps

1
Drain
PP DRAIN AQUA PROFILPAS
Define the height of the finished floor, taking into account the slope to drain off water.
Position the shower drain and connect it to the drain with a length of push-fit pipe of a suitable diameter.
Once the pipe has been fitted test for watertightness.
2
Cementitious screed
Create a screed with a 2% slope and level it off flush with the top of the drain flange. Prepare the levelling, spread the mix, saturate and float the surface to obtain a better finish.
3
Waterproofing alkali-resistant anti-fracture membrane bonded with minimum class C2 adhesive according to EN 12004
Apply the membrane using a minimum C2 class adhesive according to EN 12004 and press it thoroughly.
4
Adhesive
Apply the adhesive by brush, by roller or with a 3 mm notched trowel to bond the drain’s waterproofing membrane and MAPEGUARD WP SYSTEM accessories on MAPEGUARD WP 200.
5
Waterproofing strip
Seal all the strip for waterproofing edges between the walls and floor, adjacent walls, the different levels and the joints between adjacent pieces of membrane with MAPEGUARD WP ADHESIVE.
6
Waterproofing for internal edge/corner
Bond using MAPEGUARD WP ADHESIVE to waterproof internal corners.
7
Corner for waterproofing elements at different heights
MAPEGUARD DH
Bond using MAPEGUARD WP ADHESIVE for waterproofing elements at different heights.
8
Waterproofing seal for pipes and drains
Bond using MAPEGUARD WP ADHESIVE for waterproofing pipes and passing through drains with gaskets.
9
Adhesive
Apply the adhesive using a notched trowel for installing floor level shower profiles.
10
Profile to finish off sloping surfaces in showers
GLASS PROFILE GPS4 PROFILPAS
Apply the shower profile on the fresh adhesive for finishing the sloping floor used to cover the 2% slope.
11
Profile to finish off sloping surfaces in showers
GLASS PROFILE GPS5 PROFILPAS
Apply the front shower profile on the fresh adhesive to finish the sloping floor.
12
Profile to finish off sloping surfaces in showers
GLASS PROFILE GPS1 PROFILPAS
Apply the sloping shower profile on the fresh adhesive to house glass shower screens.
13
Profile to finish off sloping surfaces in showers
GLASS PROFILE GPS2 PROFILPAS
Apply the shower profile on the fresh adhesive to house glass shower screens.
14
Adhesive
Apply the adhesive using a notched trowel according to type and format of tiles, so that a good wetting of the back of the tiles is ensured. Where required by UNI 11493-1, use the back-buttering technique.
During the installation of tiles, in order to maintain the correct dimension of grouts and reduce any possible height difference among adjacent tiles, use levelling systems from MAPELEVEL RANGE.
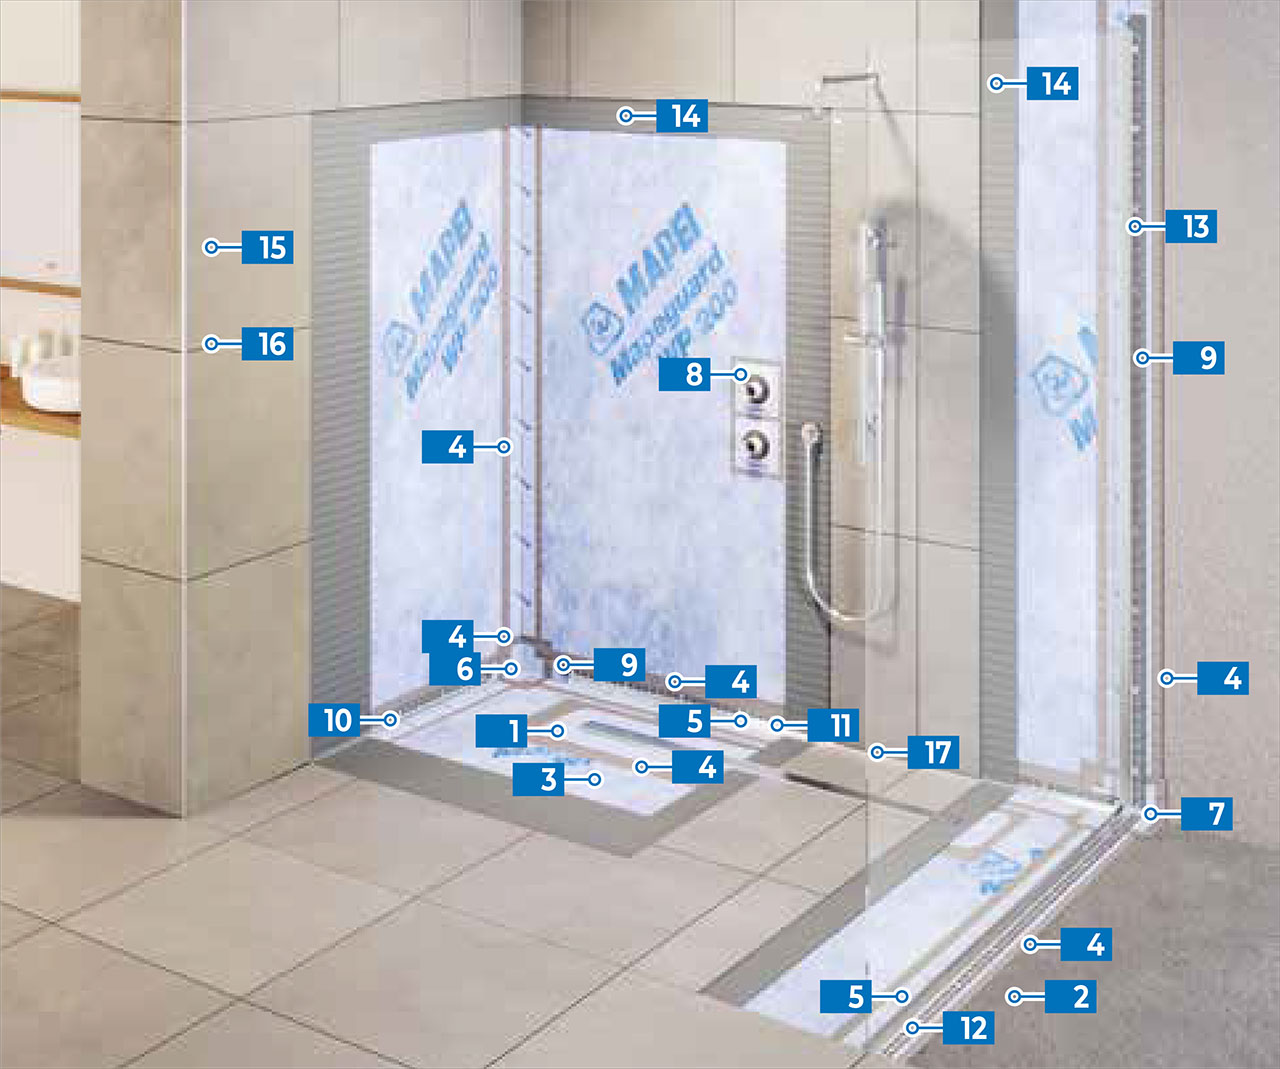
15
Porcelain tiles
16
Grouting
After the adhesive has hardened, fill the grouts in all their depth with the selected grout mix using the dedicated rubber trowel, being careful not to leave hollows or slopes.
After grouting with epoxy mortars carry out “wet” cleaning using a wet sponge and felt disks if necessary (such as Scotch-Brite®).
If necessary, carry out a final cleaning using ULTRACARE KERAPOXY CLEANER.
17
Sealant
MAPEFOAM + MAPESIL AC ECO
Seal corners, edges and expansion joints, after inserting MAPEFOAM for correct sizing and then finish the sealant’s surface using ULTRACARE SMOOTH SILICONE.
You may be interested in Installation of ceramic tiles
NOT REMOVE

Keep in touch

Subscribe to our newsletter to get Mapei news