Mapetherm Tile System XL for the application of large format ceramic tiles on external thermal insulation system

Old Building
Façade
Installation of ceramic tiles; External thermal insulation system

Products

1
Render
Level off the perimeter masonry with the rendering mortar so that its flatness and verticality are according to specifications.
2
Adhesive for insulating panels
Apply the adhesive using the double-buttering method (an even layer of adhesive on the back of the panels and on the substrate) with a suitable 10-12 mm square-notched trowel.
3
Thermo-insulating panel
4
Reinforced skimming mortar (1st coat)
Form a layer of structural render by applying the mortar in two successive layers; the first layer should be 4-5 mm thick.
5
Alkali-resistant glass fibre mesh
Place the alkali-resistant glass fibre reinforcing mesh on the first layer of skimming mortar while still fresh, overlapping adjacent pieces of mesh by at least 5 cm.
6
Fastener + washer
MAPETHERM TILE-EJOT SDF-S PLUS Ø 8 UB + MAPETHERM TILE-EJOT SBV-P 8/90 K
Fasten the panels to the substrate with the fasteners and special washers.
Insert the fasteners until the washers are sitting against the mesh.
7
Structural skimming mortar (2nd coat)
Apply a second layer of mortar 4-5 mm thick.
8
Adhesive for tiles
Apply the adhesive using the double-buttering method (in straight lines parallel to the short side of the tiles). Use a trowel with sloping notches (minimum notch size 10 mm) to spread the adhesive on the substrate and a trowel with 3-4 mm square notches for the adhesive on the back of the tiles. While installing the tiles use levelling systems from the MapeLevel line to maintain the correct width for the grouts and to reduce lippage between adjacent tiles.
9
Any type of tiles
10
Grout
Once the adhesive has set, carefully fill the grouts to their full depth using a rubber trowel without leaving gaps or steps. When the mix starts to lose its plasticity, clean off any excess product with a damp cellulose sponge. They may also be finished off while the product is partially hardened by going over the surface with a damp abrasive pad (such as a Scotch-Brite® pad). Remove any cementitious residues with UltraCare Keranet.
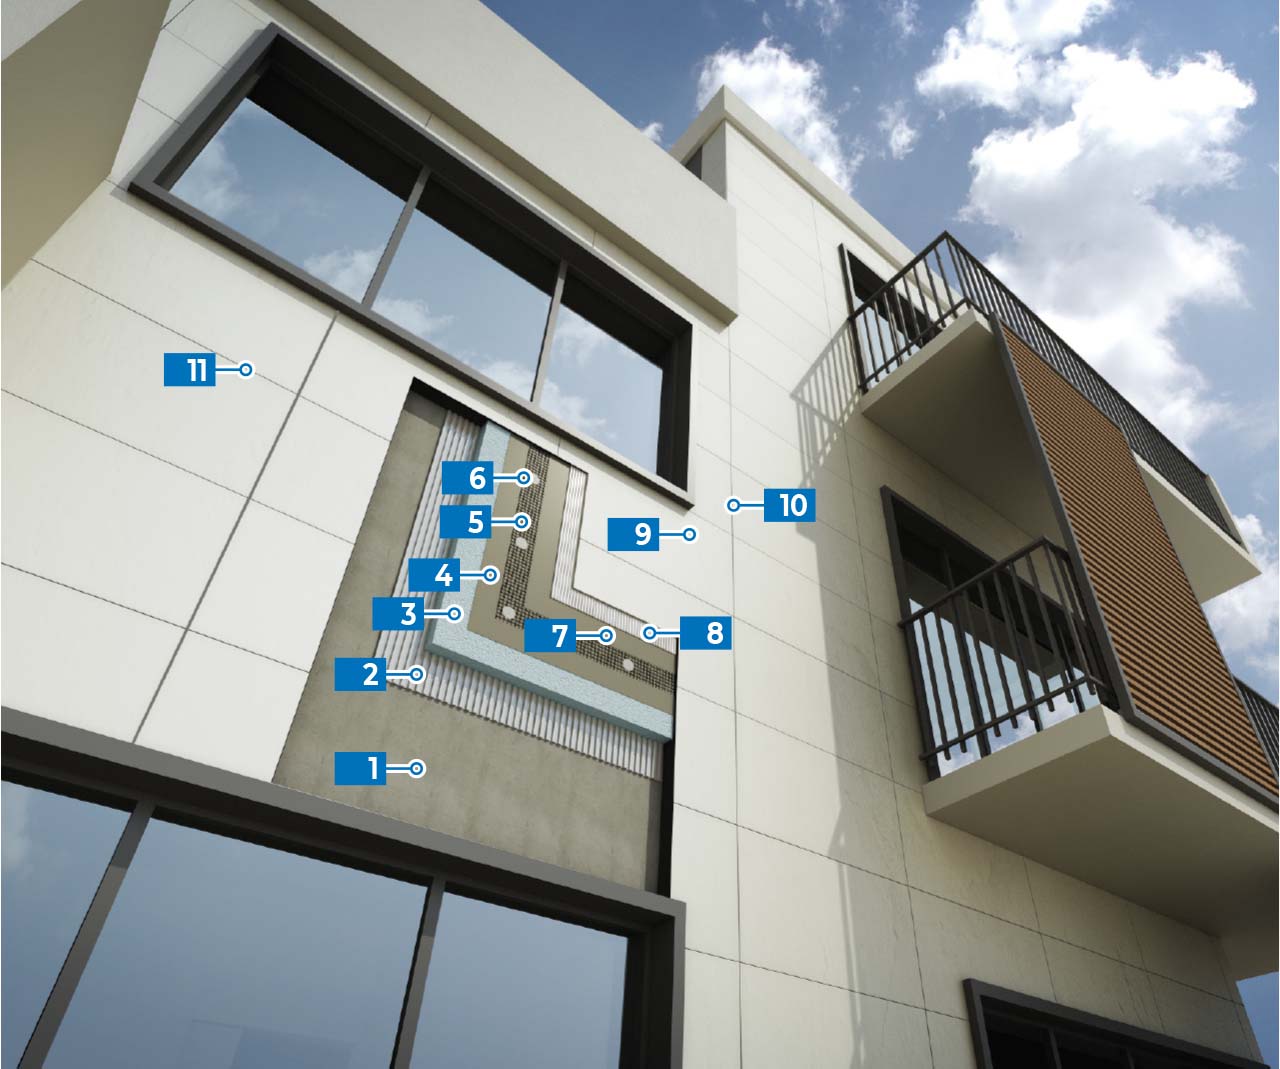
11
Sealant
Seal the corners, edges and expansion joints after inserting Mapefoam to set the correct depth and then finish off the surface of the sealant with UltraCare Smooth Silicone.
NOT REMOVE

Keep in touch

Subscribe to our newsletter to get Mapei news