System for installing natural stone tiles on a heated screed with high thermal conductivity with a layer of soundproofing after applying an isolating and anti-fracture membrane

New building
Internal flooring
Soundproofing; Installation of stone

Products

1
Concrete substrate
2
Vapour barrier
3
Soundproofing membrane
Apply the sheets on the substrate following the long side of the room. Overlap the sheets by around 5 cm.
4
Soundproofing band
Apply the soundproofing strip along the bottom of the perimeter walls and around any elements passing through the screed.
5
Soundproofing tape
Seal overlaps between the sheets with the soundproofing tape and press down firmly with a rigid roller.
6
Heating system
7
Cementitious screed
Position a series of levelling guides, spread the mix, carefully compact the mix and float-finish the surface. Minimum thickness over the heating elements: 3 cm; place metal reinforcing mesh at the mid-point or add MAPEFIBRE ST30 structural fibres.
8
Adhesive
Spread the adhesive on the screed with a No. 5 notched trowel to bond the membrane.
9
Uncoupling anti-fracture membrane
Place the membrane on the adhesive while still fresh and press down firmly on the surface with a float or a MAPEGUARD ROLLER.
10
Adhesive
Apply the adhesive using the double-buttering method with a notched trowel suitable for the type and format of the tiles so that the back of the tiles is sufficiently wetted with adhesive. While installing the tiles use levelling systems from the MapeLevel line to maintain the correct width for the grouts and to reduce lippage between adjacent tiles.
11
Carrara white marble
12
Grout
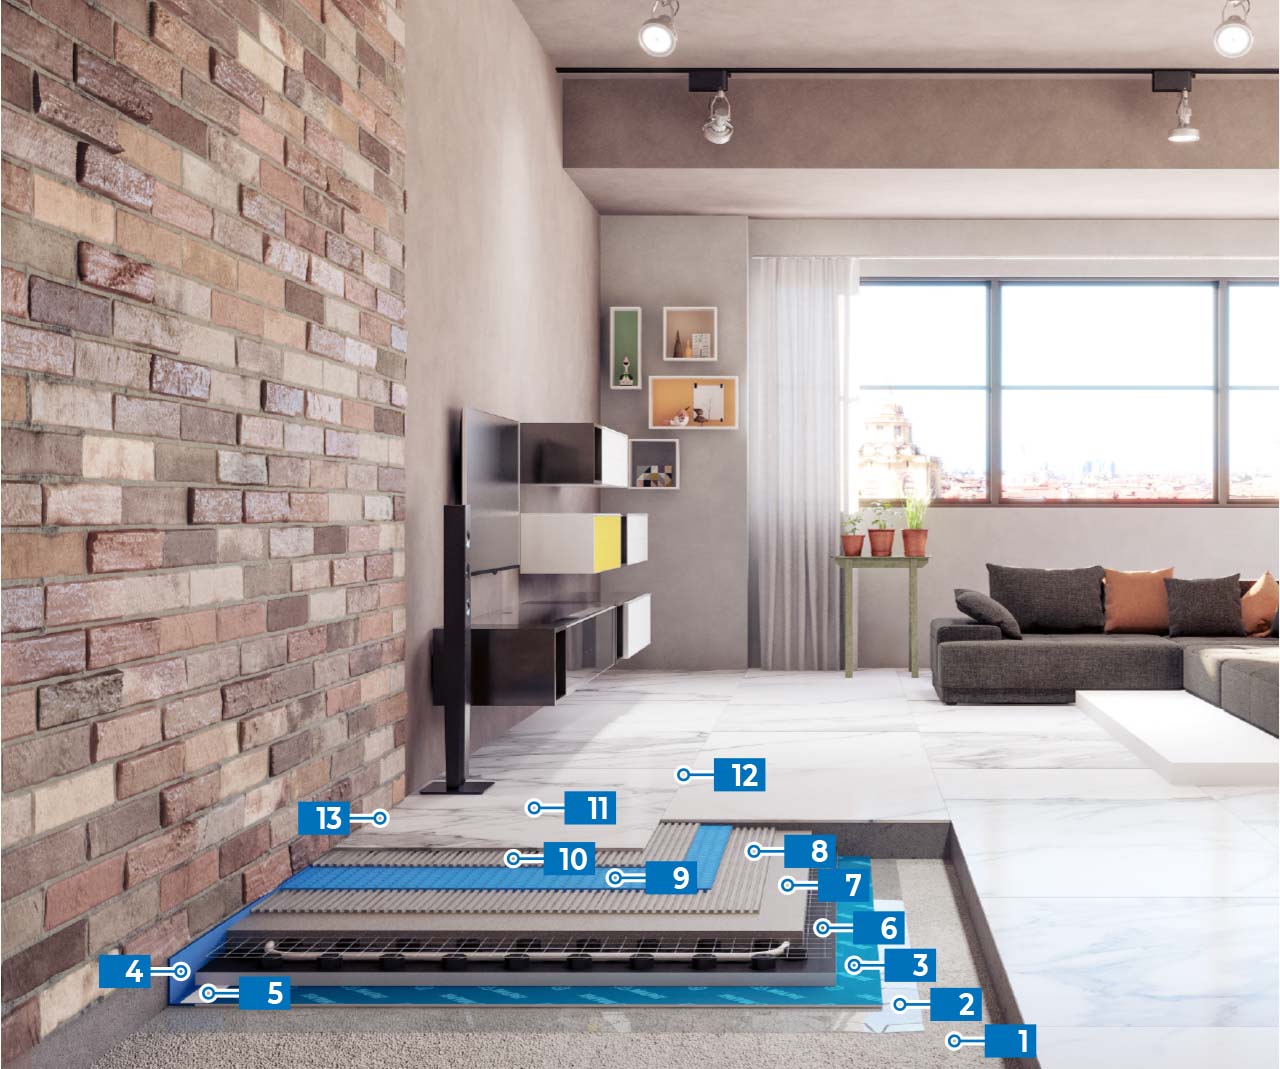
Once the adhesive has set, carefully fill the grouts to their full depth using a rubber trowel without leaving gaps or steps. When the mix starts to lose its plasticity, clean off any excess product with a damp cellulose sponge. They may also be finished off while the product is partially hardened by going over the surface with a damp abrasive pad (such as a Scotch-Brite® pad). Remove any cementitious residues with UltraCare Keranet.
13
Sealant MAPEFOAM + MAPESIL LM
Seal the perimeter and expansion joints after inserting Mapefoam to set the correct depth and then finish off the surface of the sealant with UltraCare Smooth Silicone.
You may be interested in Soundproofing Installation of stone
NOT REMOVE

Keep in touch

Subscribe to our newsletter to get Mapei news